Expert Roofing Guidance for Denver Homeowners Planning a New Roof
Expert Roofing Guidance for Denver Homeowners Planning a New Roof
Denver homeowners face roofing challenges that most Americans simply never encounter. Between hailstorms, heavy snowfall, freeze-thaw cycles, powerful winds, and intense high-altitude UV exposure, your roof takes a beating year-round. Choosing the wrong materials or installer can mean costly repairs within just a few years.
This guide walks you through everything — from knowing when it’s time for a replacement, to choosing the right materials, understanding permits, and avoiding common mistakes. Whether you’re planning a new roof installation in Denver or evaluating storm damage, use this as your complete resource.
Why Roof Installation in Denver Is Different
Few homeowners truly appreciate the punishment Denver’s climate deals to roofing systems. A roof here must simultaneously handle:
- Hailstorms – Colorado is part of the U.S. “Hail Alley”, where hail is more frequent and severe than almost anywhere else in the country.
- Heavy snow loads — Flat or low-pitch roofs can accumulate enormous weight during Colorado winters.
- Freeze-thaw cycles — Water expands when it freezes, forcing its way into cracks and seams, accelerating breakdown.
- High-altitude UV exposure — Denver sits at 5,280 feet, where UV radiation is significantly more intense than at sea level, causing materials to dry out and age faster.
- Strong winds – Wind events can lift shingles, compromise flashings, and expose underlayment.
A roof may look fine from the street after a hailstorm, but each impact gradually weakens shingles and shortens the entire system’s lifespan. Poor ventilation and inadequate flashing compound these problems when snow and ice are involved.
This is exactly why so many Denver homeowners prefer working with local professionals like 303 Roofer, who understand how Denver’s unique climate affects roof performance and which installation details matter most for long-term protection.
When Do You Need a New Roof Installation?
Not every roofing job requires a full replacement — but many do. Understanding the difference saves you money and prevents costly patchwork repairs down the road.
New Construction Roof Installation
For new builds, roof installation starts from the structural deck up, incorporating every layer of the system. The contractor applies underlayment, flashing, ventilation components, and finished roofing material as a complete new assembly.
Full Roof Replacement
When an aging roof has reached the end of its serviceable life, is too widely damaged to repair economically, or has multiple overlapping issues, a full replacement delivers better long-term value than continued patching.
Storm or Hail Damage Installation
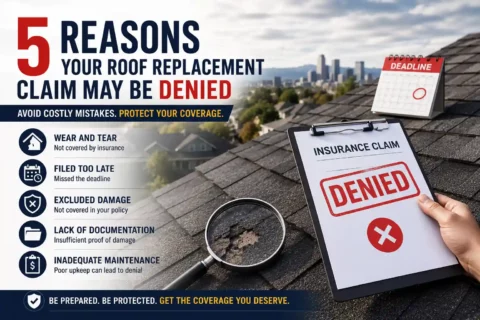
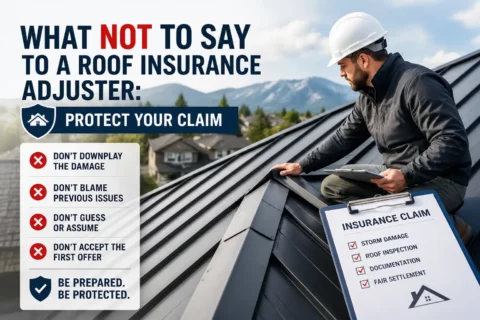
Denver homeowners frequently deal with roof damage after hailstorms or wind events. If a roof shows significant impact damage, missing shingles, broken flashing, or widespread wear, a new installation is usually the smartest path forward – especially when filing an insurance claim for storm damage.
Roofing Following Significant Structural Repairs
If your home has undergone structural repairs — such as water damage restoration or extensive decking replacement – a completely new roofing system is typically required as part of that process.
The rule of thumb: Repair handles isolated problems. Replacement handles systemic ones. When age combines with multiple issues, a full installation is almost always the better long-term investment.
Signs It’s Time to Install a New Roof
Wondering if your Denver home is due for a new roof? Watch for these warning signs:
- Curling, cracked, or missing shingles
- Repeated leaks or water stains appearing inside the home
- Granule loss collecting in gutters or around downspouts
- Sagging roof sections anywhere on the structure
- Visible hail or wind damage
- Roofing materials that are approaching or past their rated lifespan
Is a 20-year-old roof worth replacing? In most Denver cases, yes — or at minimum, it should be professionally assessed. A two-decade-old roof in Colorado has likely endured years of punishing snow, hail, UV, and temperature cycling. Its remaining value is often minimal because significant repairs or full replacement are likely imminent.
If you’re spotting several of these warning signs simultaneously, contact a trusted local company like 303 Roofer for a professional inspection before deciding between repair and replacement.
Step-by-Step Roof Installation Guide
Here’s exactly what happens during a professional residential roof installation in Denver – from initial inspection through final cleanup.
Step 1: Roof Inspection and Planning
Every roofing project begins with a thorough inspection. The contractor measures the roof, evaluates pitch and layout, checks existing flashing areas, looks for decking damage, and identifies drainage and ventilation concerns.
This is also when homeowners review material options, set budget expectations, and confirm project timing. A contractor like 303 Roofer will walk you through what’s needed and why, so you’re never left guessing about your roof’s condition.
Step 2: Choosing the Right Roofing Material
Material selection is one of the most important decisions in any Denver roof installation. See our full material comparison below.
Popular options include:
- Asphalt shingles – most common, affordable, widely available
- Metal roofing – durable, excellent snow performance, long lifespan
- Tile roofing – attractive, long-lasting, but may require structural reinforcement
- Low-slope / flat roof systems – designed specifically for lower-pitch applications
In Denver, the best materials offer strong weather resistance, reliable wind performance, and proven durability against hail and intense sun exposure.
Step 3: Permit and Code Requirements in Denver
Many roofing projects in Denver require permits before work can begin. Local requirements often address flashing standards, ventilation specifications, layer limits, and roof type. Because these requirements can change, always verify the current Denver permit rules before starting any project.
Working with a local contractor like 303 Roofer helps ensure your installation meets all current local expectations. They’ll know which permits apply to your specific project. You can also reference Denver’s Community Planning and Development portal for current permitting information.
Step 4: Removing the Old Roof
For most replacement projects, the old roofing material is completely removed before the new system is installed. This tear-off process allows the contractor to inspect the underlying decking and catch hidden damage – rot, soft spots, moisture infiltration, or compromised structural sections – that would otherwise be buried under new materials. Debris disposal is included in this step and should be outlined in your estimate.
Step 5: Repairing or Replacing Roof Decking
Once the old roof is removed, the decking gets a careful inspection. Any damaged or weakened sections must be repaired or replaced before new materials are installed. Skipping this step is a critical mistake – even premium roofing materials underperform when installed over a compromised surface. A solid deck is the foundation of a roof that lasts.
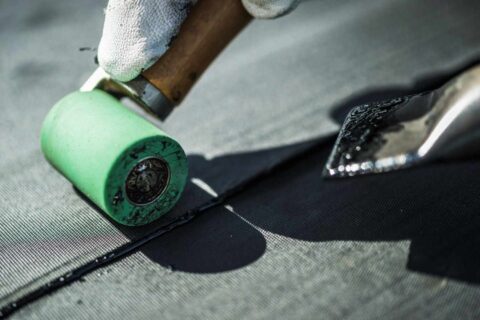
Step 6: Installing Underlayment and Ice Protection
Homeowners often ask, “What’s that black material roofers install before adding the shingles?” In most cases, that’s underlayment — a moisture protection layer applied over the decking before shingles or panels go down.
This layer acts as an additional barrier against water intrusion. In Denver, where snow, ice, and freeze-thaw conditions stress roofing systems constantly, underlayment and ice and water shield in vulnerable areas are especially critical.
Step 7: Flashing and Ventilation Setup
Flashing is installed around chimneys, skylights, roof valleys, walls, and all penetrations, the most common leak points on any home. Careful, precise flashing work is non-negotiable.
Ventilation is equally important. A properly ventilated roof balances intake and exhaust airflow to regulate heat and moisture in the attic. Poor ventilation shortens roof lifespan, reduces energy efficiency, and creates moisture problems inside the home. Climate-aware ventilation planning, something experienced Denver contractors understand well, plays a major role in long-term roof performance.
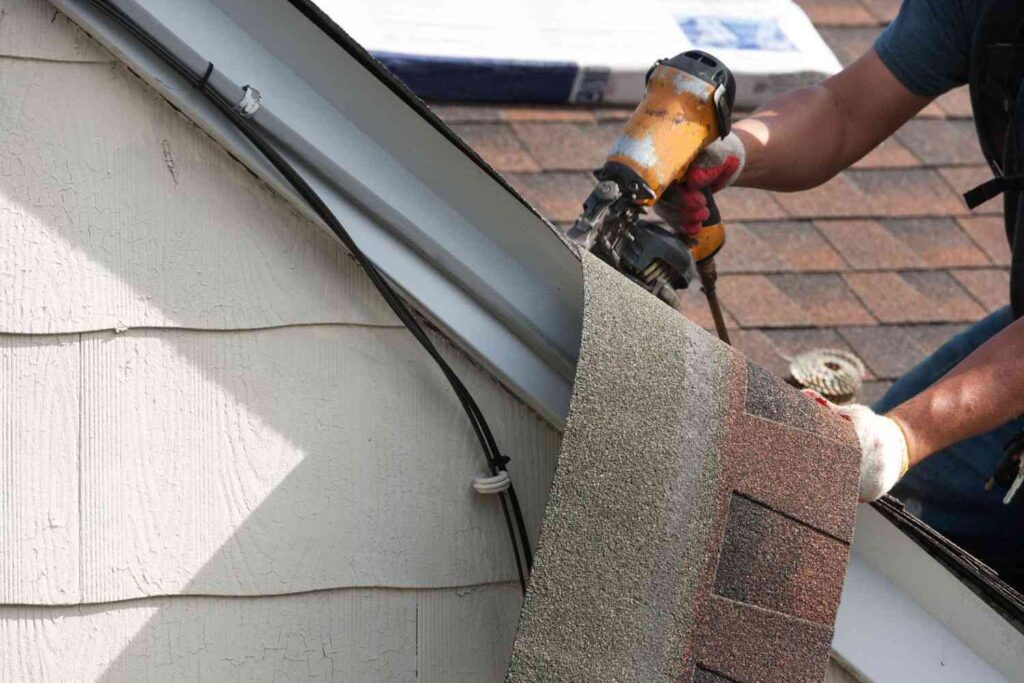
Step 8: Installing the Roofing Material
With all prep complete, the final roofing material goes on. This includes starter courses, the main roofing field, ridge components, and all system-specific finishing details.
Precise installation is critical here. Shingle placement, fastening patterns, overlap dimensions, and flashing integration all directly affect how the roof handles severe Denver weather. Proper installation also protects your manufacturer’s warranty – sloppy work can void coverage even on premium materials. Learn more about roofing warranties from the National Roofing Contractors Association.
Step 9: Final Inspection and Cleanup
The final step includes complete debris removal, nail sweeping, and a thorough review of the finished work. Before the crew leaves, you should receive:
- Warranty documentation (both workmanship and manufacturer)
- Maintenance recommendations
- A full walkthrough of what was installed
A professional roofing company leaves your property clean and ensures you understand how to care for your new roof going forward.
Best Roofing Materials for Denver Homes
Asphalt Shingles
Still the most popular choice for Denver homeowners, asphalt shingles offer affordability and versatility across a wide range of home styles. When installed correctly with adequate ventilation, they’re a practical option for many budgets.
What damages asphalt shingles the most? The main culprits in Denver are hail impact, UV radiation, inadequate roof ventilation, poor installation workmanship, aging, and moisture-related problems.
Impact-Resistant Shingles
For Colorado homes, impact-resistant shingles are a compelling upgrade. Designed specifically to handle hail and severe weather, they deliver a balance of cost, durability, and peace of mind that standard shingles can’t match. Many homeowners also qualify for homeowner’s insurance discounts when using Class 4 impact-resistant roofing. Check with your insurer or reference Insurance Institute for Business & Home Safety (IBHS) ratings for qualifying products.
Metal Roofing
Metal roofing offers a long lifespan, low maintenance requirements, and outstanding weather resistance. It performs exceptionally well in snow-heavy climates and is a smart long-term investment for homeowners who want a durable, low-maintenance system. Learn more about metal roofing performance from the Metal Roofing Alliance.
Concrete or Tile Roofing
Tile and concrete roofing provide long service life and a distinctive aesthetic. The tradeoff: they’re heavier than other options and may require a structural assessment before installation to confirm your home can support the load.
Low-Slope and Flat Roof Systems
Homes with low-slope surfaces require roofing systems specifically engineered for those applications – standard steep-slope shingles won’t work. These systems should be installed only by contractors experienced with the appropriate techniques and products.
Which material offers the best value? For most Denver homeowners, architectural or impact-resistant asphalt shingles offer excellent performance at a reasonable price point, while metal roofing delivers the strongest long-term durability ROI.
Denver Roofing Codes and Permit Basics
Roof installation in Denver isn’t just about materials – code compliance is equally important. Key basics include:
- Some projects require permits before work begins
- Code compliance protects both the safety and performance of your roof
- Layer limits may require a full tear-off rather than a re-cover
- Flashing, penetrations, and ventilation all have specific code requirements
Because local rules evolve, always confirm current Denver requirements before starting work. Visit Denver’s official permitting portal or work with a local contractor like 303 Roofer, who stays current on local code changes.
How Long Does Roof Installation Take in Denver?
Most residential roof replacements are completed in one to three days, depending on:
- Roof size and structural complexity
- Roofing material selected
- Weather conditions at the time of installation
- Whether decking repairs are needed
Denver’s weather can affect scheduling in unexpected ways – wind, snow, rain, or cold temperatures all influence when and how materials can be safely installed. Many roofing contractors can work in temperatures as low as 40°F, though material type and installation methods both factor into that decision.
Storm seasons can also compress scheduling significantly, so planning ahead whenever possible is strongly advised.
Roof Installation Costs in Denver
Roof installation costs vary based on size, materials, labor, and the condition of the existing roof.
Cost by Roofing Material
Asphalt shingles are the most budget-friendly option. Metal, tile, and specialty systems carry higher upfront costs. Impact-resistant materials may cost more initially but often reduce long-term repair and replacement expenses — an important calculation in hail-prone Colorado.
Cost by Roof Size
Many homeowners search for the cost of re-roofing a 2,000 sq ft house, but square footage alone doesn’t determine price. Roof pitch, complexity, valleys, penetrations, tear-off requirements, and material selection all significantly affect the final number.
What Drives Installation Costs Up?
The biggest cost factors include:
- Steep or complex roof pitch
- Removing multiple layers of old materials
- Decking repairs discovered after the tear-off
- Extensive flashing work
- Ventilation system upgrades
- Insurance-related storm damage restoration
- Premium material upgrades
What’s the most expensive part of a new roof? It’s typically a combination of labor, material selection, and hidden repair work uncovered once the old roof is removed.
Is there a cheaper time of year to replace a roof? Pricing can be more flexible during slower seasons, but weather, contractor availability, and urgency usually matter more than trying to time the market.
Roof Installation Mistakes to Avoid
Avoid these common errors that Denver homeowners make:
- Selecting the cheapest bid without carefully reviewing what’s included in the scope
- Skipping permits or failing to verify local code compliance
- Ignoring ventilation needs – a hidden but critical factor in roof longevity
- Installing new materials over damaged or compromised decking
- Choosing materials not rated for Denver’s specific weather conditions
- Hiring uninsured or inexperienced contractors
How can you tell if a roofer is being dishonest? Red flags include vague or inconsistent pricing, high-pressure sales tactics, unclear contract language, missing paperwork, unrealistic promises, and refusal to provide proof of insurance or references. The Better Business Bureau and Colorado Department of Regulatory Agencies are good resources for verifying contractor credentials.
How to Choose a Roof Installer in Denver
Check Licensing and Insurance
Always confirm the roofing contractor carries proper insurance and holds the appropriate licenses to perform work in Denver. Verify coverage before signing anything.
Ask About Denver-Specific Experience
A contractor with genuine local experience will understand how hail, snow, wind, and UV affect roofing systems in Denver — and will make better material and installation recommendations as a result.
Review Warranties Carefully
Ask about both workmanship warranties and manufacturer warranties. Quality installation matters just as much as the product itself. A great shingle installed poorly won’t perform as rated.
Request a Detailed Written Estimate
A professional estimate should clearly itemize: material choices, tear-off scope, underlayment and ice protection, flashing work, cleanup, and any anticipated repair allowances for decking or other issues.
Ask About Storm and Hail Expertise
Because storm damage is so common in Colorado, prioritize roofing companies with proven experience in hail-related damage assessment and material recommendations for high-impact environments.
303 Roofer is a strong local option for Denver homeowners who want clear communication, genuine Denver-specific expertise, and practical guidance through every step of the installation process.
How to Prepare Your Home for Roof Installation
Before roofing work begins, a few simple steps protect your property and help the project run smoothly:
- Move vehicles away from the work area and driveway
- Protect attic storage from dust and vibration
- Secure fragile wall décor and artwork inside the home
- Give neighbors advance notice that roofing work is coming
- Keep children and pets out of the work zones throughout the project
- Ask the contractor how access, staging, and daily cleanup will be managed
A little preparation goes a long way toward a smoother, less stressful installation day.
After Installation: What to Expect
Once roof installation is complete, a professional contractor will conduct a final inspection, provide warranty documentation, and walk you through maintenance recommendations. Gutters should be cleaned and checked as part of the wrap-up, and any follow-up steps should be clearly explained.
Going forward, schedule a professional inspection after every major hailstorm in Denver, regardless of when your roof was installed. A new roof is built to protect your home, but routine post-storm inspections catch problems early and help maintain long-term performance. The Federal Emergency Management Agency (FEMA) offers useful guidance on post-storm damage assessment as well.
FAQ’s
Q1.How long does a roof installation take?
Ans: Most standard residential projects are completed in one to three days, though larger or more complex roofs may take longer.
Q2. What roofing material is best for Denver’s weather?
Ans: Impact-resistant shingles and metal roofing are two of the strongest options for Colorado’s combination of hail, UV, snow, and wind. See our full material guide above.
Q3. Do I need a permit for roof installation in Denver?
Ans: Many projects do require permits depending on the scope of work. Always confirm current requirements with Denver’s permitting office before work begins.
Q4. Can a new roof help with hail damage protection?
Ans: Yes. Choosing impact-resistant or Class 4-rated materials can meaningfully improve your roof’s resistance to hail and reduce the likelihood of damage over time.
Q5. How much does roof installation cost in Denver?
Ans: Costs vary based on roof size, material choice, labor, and repair needs. The most accurate number comes from a detailed inspection and a written estimate from a qualified local contractor.
Q6. Should I choose asphalt or metal roofing in Colorado?
Ans: Asphalt is more budget-friendly upfront, while metal typically offers stronger long-term durability and lower lifecycle costs. The right answer depends on your budget, timeline, and long-term goals.
Q7.How often should a Denver roof be inspected?
Ans: At minimum, once per year — and after every significant hail or wind event, regardless of the roof’s age.
Get Expert Roof Installation Help in Denver
A roof in Denver has to be more than attractive – it must withstand everything Colorado throws at it across all four seasons. That’s why selecting the right materials and the right installer matters so much.
Whether you’re planning a new roof installation in Denver, exploring upgrade options, or dealing with storm damage, 303 Roofer brings the local knowledge and hands-on experience needed to help you make confident, informed decisions. From the first inspection through final cleanup, working with a Denver-focused roofing company transforms a stressful process into a straightforward one.
Ready to get started? Contact 303 Roofer for a professional inspection or detailed estimate tailored to your home and Denver’s specific conditions.
Related Blog Articles