How to Winterize Your Roof in Denver: Complete Fall Checklist
Knowing how to winterize your roof in Denver can help protect your home from snow, ice, freezing temperatures and unexpected winter leaks. Colorado winters put roofing systems under considerable seasonal stress, and even minor problems can become more serious when water freezes, expands and finds its way beneath damaged roofing materials.
For homeowners, understanding how to winterize your roof in Denver means preparing more than just the shingles. Gutters, flashing, attic insulation, ventilation and roof drainage all play an important role in protecting your property. A complete fall inspection can help identify weaknesses before winter weather makes repairs more difficult.
Whether you own an older home or a newer property, learning how to winterize your roof in Denver gives you a practical starting point for seasonal maintenance. The team at 303 Roofers helps homeowners across the Denver metro area understand their roofing needs and prepare their properties for changing weather conditions.
This guide covers the essential fall checklist, common winter roofing problems, preparation costs and signs that you may need professional assistance.
Why Winter Roof Preparation Matters in Denver
Denver’s climate can expose roofing systems to several different weather conditions throughout the year. Winter brings a combination of snowfall, freezing temperatures, strong winds, occasional warm spells and repeated temperature changes.
These conditions can affect roofing materials in different ways.
Freeze-Thaw Cycles
During the day, temperatures may rise enough for snow and ice to melt. When temperatures fall again overnight, the remaining water can freeze.
Water that enters small cracks or gaps may expand as it freezes. Repeated freezing and thawing can place additional stress on roofing materials, flashing, sealants and other vulnerable areas.
A small defect that appears harmless during autumn may become a source of moisture intrusion during winter.
Snow and Ice Accumulation
Snow accumulation adds weight to a roof. The actual load depends on the depth, density and moisture content of the snow, as well as the roof’s design.
Wet snow can be considerably heavier than light, dry snow. Areas with low slopes, roof valleys or drifting snow may also experience uneven accumulation.
Most properly constructed residential roofs are designed to handle expected local conditions. However, existing structural problems, damaged decking or unusual snow accumulation may require professional assessment.
Ice Dams
Ice dams form when melting snow refreezes near the colder edges of a roof.
This can happen when heat escapes into the attic and warms parts of the roof surface. Meltwater travels towards the eaves, where colder temperatures cause it to freeze. As ice builds up, water may collect behind it and potentially move beneath roofing materials.
Ice dams can contribute to:
- Water stains on ceilings and walls
- Damaged shingles and roof edges
- Wet attic insulation
- Moisture problems around roof penetrations
- Damage to gutters and fascia
Proper insulation, ventilation and drainage can help reduce the conditions that contribute to ice dams.
Sunlight and UV Exposure
Denver’s high elevation means sunlight and ultraviolet exposure are important considerations for roof maintenance.
Over time, UV exposure can contribute to the ageing of roofing materials, including asphalt shingles and exposed sealants. Seasonal temperature changes can add further stress.
Inspecting your roof before winter helps identify ageing or damaged materials that may need attention.
The Complete Denver Roof Winterization Checklist
Preparing your roof for winter involves checking several parts of your roofing system. Use the following checklist as a starting point before temperatures consistently drop.
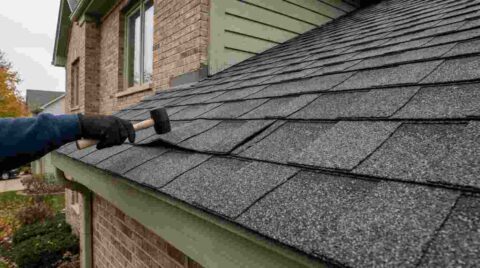
1. Inspect Shingles and Roofing Materials
Start by checking your roof’s visible condition from the ground.
Look for:
- Missing or displaced shingles
- Curling, cracked or buckling shingles
- Areas with visible granule loss
- Damaged ridge caps
- Loose or exposed roofing materials
- Signs of previous repairs that may have deteriorated
If your property has a flat or low-slope roof, look for visible membrane damage, open seams, ponding water or areas where the surface appears uneven.
Do not climb onto the roof to investigate these problems yourself, particularly when surfaces are wet, icy or unstable. A qualified roofing professional can carry out a closer inspection using appropriate safety equipment.
Damaged roofing materials should be assessed and repaired before snow and ice make access more difficult.
2. Inspect and Repair Flashing
Flashing helps protect the joints and transitions where water could otherwise enter the roofing system.
It is commonly installed around:
- Chimneys
- Skylights
- Roof valleys
- Plumbing vents
- Exhaust vents
- Roof-to-wall connections
During your fall inspection, look for visible signs of:
- Bent or lifted metal
- Rust or corrosion
- Missing or deteriorated sealant
- Gaps around roof penetrations
- Loose flashing components
Flashing problems can allow water to enter even when the surrounding shingles appear to be in good condition.
A roofing professional can determine whether the flashing needs resealing, repair or replacement.
3. Clean Gutters and Downspouts
Gutters play an important role in moving rainwater and melting snow away from your roof and foundation.
Leaves, twigs, roof granules and other debris can restrict water flow. When temperatures drop, trapped water may freeze and contribute to gutter damage or ice accumulation.
Your fall gutter checklist should include:
- Removing leaves and accumulated debris
- Clearing downspouts
- Checking that water flows freely
- Looking for loose or sagging gutter sections
- Inspecting visible seams and joints
- Checking that downspouts direct water away from the foundation
Homes surrounded by mature trees may require more frequent gutter cleaning during autumn.
Gutter guards can reduce the amount of debris entering the system, but they do not eliminate the need for periodic inspection and maintenance.
4. Trim Overhanging Tree Branches
Branches close to your roof can create additional maintenance concerns during winter.
Heavy snow and ice may increase the weight of tree branches, while strong winds can cause damaged or weakened limbs to break.
Overhanging branches can also:
- Drop leaves and debris into gutters
- Scratch or rub against roofing materials
- Block sunlight from reaching parts of the roof
- Create additional cleaning requirements
Arrange appropriate tree trimming before winter if branches are close to your property.
For large trees or branches near power lines, use a qualified tree-care professional rather than attempting the work yourself.
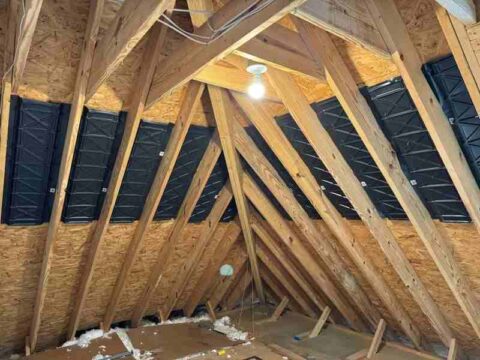
5. Check Attic Insulation
Attic insulation helps reduce heat transfer between your living space and the roof.
Insufficient or uneven insulation can allow heat to escape into the attic, potentially warming parts of the roof and contributing to uneven snow melting.
Check for:
- Thin or uneven insulation coverage
- Compressed or damaged insulation
- Gaps around attic hatches
- Missing insulation near access points
- Signs of moisture or previous water damage
The appropriate insulation level depends on the building, existing materials and applicable energy recommendations.
If you are considering an upgrade, an insulation professional can assess your attic and recommend suitable improvements.
6. Verify Attic Ventilation
Insulation and ventilation work together to help maintain suitable attic conditions.
A properly designed ventilation system allows air to move through the attic and helps manage heat and moisture.
Check whether:
- Soffit vents are clear
- Ridge or roof vents are unobstructed
- Insulation is blocking intake vents
- Bathroom exhaust fans discharge outdoors
- Kitchen exhaust systems are properly routed
- There are signs of condensation or moisture on the roof decking
Poor ventilation can contribute to moisture accumulation and may increase the likelihood of winter roofing problems.
If you notice frost, persistent condensation or a musty smell in the attic, arrange an assessment to identify the cause.
7. Inspect Roof Penetrations and Pipe Boots
Roof penetrations are common locations for potential leaks.
Plumbing vents, exhaust pipes, skylights and other roof openings need appropriate flashing and weatherproof seals.
Rubber pipe boots and exposed sealants can deteriorate over time due to sunlight and temperature changes.
Look for:
- Cracked or deteriorated rubber boots
- Gaps around pipe openings
- Loose flashing
- Damaged sealant
- Signs of moisture around interior ceiling areas
A damaged pipe boot may allow water to enter the roof even if the surrounding shingles are intact.
Have deteriorated components repaired or replaced before winter weather arrives.
8. Inspect Your Chimney
If your home has a chimney, include it in your autumn maintenance routine.
Check for visible concerns involving:
- Chimney caps
- Metal flashing
- Cracked mortar joints
- Damaged masonry
- Deteriorated chimney crowns
- Signs of water entering around the chimney
A damaged chimney cap may allow rain, snow or debris to enter the flue. Cracked masonry can also allow moisture to penetrate and deteriorate the surrounding structure.
A qualified chimney professional can assess the chimney itself, while a roofing contractor can evaluate the roof flashing and surrounding roofing materials.
9. Check Roof Drainage and Low-Slope Areas
Flat and low-slope roofs need particular attention before winter.
Water should be able to drain through the designed drainage system without persistent pooling.
Check visible drainage areas for:
- Blocked roof drains
- Accumulated leaves and debris
- Damaged membrane seams
- Areas of persistent ponding
- Loose or deteriorated roof edges
Standing water can create additional problems when temperatures fall and the water freezes.
If you own a commercial property or a home with a low-slope roof, ask your contractor to assess the drainage system and membrane condition as part of the winter inspection.
10. Schedule a Professional Roof Inspection
A visual check from the ground is useful, but it cannot identify every roofing problem.
A professional inspection can help assess the condition of shingles, flashing, roof penetrations, drainage components and other areas that may be difficult to examine safely.
It can also help identify problems that are not yet visible inside the property.
If you are preparing your home for the colder months, 303 Roofers can help you understand your roof’s condition and identify areas that may need maintenance or repair.
What Does Roof Winterization Cost in Denver?
The cost of preparing a roof for winter depends on its current condition and the work required.
A property that needs routine gutter cleaning and a minor repair will have different costs from one that requires flashing replacement, insulation improvements or more extensive roofing work.
The following table provides general service categories to help homeowners understand what may be involved. These are not guaranteed Denver market prices; request current local estimates for your property.
| Service | What Can Affect the Cost |
| Professional roof inspection | Roof size, accessibility and inspection scope |
| Gutter cleaning | Property height, gutter length and debris levels |
| Shingle repair | Number of damaged shingles and material type |
| Flashing repair | Location, extent of damage and access |
| Pipe boot replacement | Boot type and roof accessibility |
| Attic insulation upgrade | Attic size, existing insulation and material |
| Gutter guard installation | Gutter length and selected product |
| Flat roof maintenance | Membrane type, drainage and repair requirements |
What Influences the Final Price?
Several factors can affect the final cost of winter preparation:
- Roof size: Larger roofs may require more inspection and maintenance time.
- Roof design: Steep pitches, multiple valleys and complex layouts can increase labour requirements.
- Material type: Asphalt shingles, metal roofs and membrane systems require different repair methods.
- Existing damage: Extensive deterioration may require more than routine maintenance.
- Accessibility: Difficult-to-reach areas can affect the time and equipment needed.
- Additional work: Insulation, ventilation and drainage improvements may be separate from roofing repairs.
Request a written estimate that explains the recommended work and associated costs before approving a project.
Common Winter Roofing Emergencies in Denver
Even a well-maintained roof can experience problems during severe weather. Knowing how to respond can help reduce further damage.
Active Roof Leaks
If water begins entering your home:
- Place a container beneath the leak.
- Move furniture and valuables away from the affected area.
- Avoid touching electrical fixtures or wiring near the water.
- Document visible damage when it is safe to do so.
- Contact a qualified roofing professional.
Do not climb onto an icy roof to locate or repair the leak.
Ice Dams at the Roof Edge
If thick ice begins forming along your roof’s eaves, avoid trying to break it apart with a hammer or sharp tool.
Improper removal can damage shingles, gutters and other roofing components.
A professional can assess the situation and recommend a safe approach. Longer-term improvements may involve addressing attic insulation, ventilation and roof-edge protection.
Heavy Snow Accumulation
Most residential roofs are designed to withstand expected local snow conditions, but unusually heavy accumulation can be a concern, especially on low-slope roofs or properties with existing structural problems.
Watch for warning signs such as:
- Visible roof sagging
- New cracks in ceilings or walls
- Doors or windows suddenly becoming difficult to open
- Unusual creaking or popping sounds
If you suspect structural stress, keep people away from the affected area and seek professional assistance promptly.
Never climb onto a snow-covered roof to remove snow yourself.
Fallen Branches or Storm Debris
If a branch falls onto your roof, do not attempt to remove a large or unstable branch yourself.
Keep away from damaged areas, photograph the visible damage when safe and contact an appropriate tree-care or roofing professional.
If the damage may be covered by insurance, contact your insurer and follow its documentation and claim procedures.
When Should You Winterize Your Roof in Denver?
Autumn is generally the most practical time to prepare a roof for winter.
Starting in September or early autumn gives homeowners time to arrange inspections, clean gutters and complete repairs before colder conditions become more frequent.
A useful seasonal schedule is:
| Period | Recommended Tasks |
| Early autumn | Inspect roofing materials and identify damage |
| Mid-autumn | Clean gutters and downspouts; trim nearby branches |
| Late autumn | Address flashing, pipe boots and other repairs |
| Before regular freezing temperatures | Review attic insulation, ventilation and drainage |
| During winter | Monitor for leaks, ice accumulation and storm damage |
| Early spring | Arrange a post-winter roof assessment if needed |
The exact timing depends on weather conditions and contractor availability. Scheduling early can give you more flexibility if repairs are needed.
Mistakes to Avoid When Preparing Your Roof for Winter
Some maintenance mistakes can create additional problems rather than prevent them.
Avoid these common errors:
Ignoring small leaks: A minor leak may become more difficult to manage when snow and ice accumulate.
Cleaning gutters only once: Properties surrounded by trees may need more than one cleaning during autumn.
Blocking attic ventilation: Adding insulation without checking ventilation can create other moisture-related problems.
Walking on an icy roof: Roof surfaces become especially dangerous during winter conditions. Leave roof inspections and repairs to qualified professionals.
Using sharp tools to remove ice: Hammers, chisels and other tools can damage roofing materials.
Ignoring flat roof drainage: Low-slope systems need functioning drains and clear drainage paths.
Choosing a contractor based only on price: A detailed estimate, appropriate insurance, relevant experience and clear communication are important when comparing roofing companies.
Frequently Asked Questions About Winterizing a Roof in Denver
Q1. When should I start winterizing my roof in Denver?
Ans: Early autumn is a good time to begin. September and October often provide an opportunity to inspect roofing materials, clean gutters and arrange repairs before regular freezing conditions arrive. The ideal schedule depends on the weather and the condition of your roof.
Q2. Should I remove snow from my roof after every storm?
Ans: No. Snow removal is not automatically necessary after every snowfall. Most residential roofs are designed for expected local snow conditions. If you notice unusual accumulation, visible sagging or other signs of structural stress, seek professional advice. Never climb onto a snow-covered roof yourself.
Q3. Do ice and water shield membranes prevent ice dams?
Ans: Ice and water shield membranes provide an additional water-resistant layer beneath roofing materials in vulnerable areas. They can help reduce water intrusion if water backs up beneath shingles, but they do not prevent ice dams from forming. Insulation, ventilation and drainage also matter.
Q4. How do I know if my attic ventilation is adequate?
Ans: Signs of possible ventilation problems include persistent condensation, frost on the underside of roof decking, musty smells and recurring moisture concerns. A roofing or insulation professional can assess your attic and determine whether ventilation improvements are appropriate.
Q5. Can I repair my roof during winter in Denver?
Ans: Some roofing repairs can be completed during winter, depending on temperatures, weather conditions, materials and the nature of the damage. Emergency leak protection may also be possible. Your contractor should explain whether conditions are suitable for the proposed work.
Q6. Can clogged gutters cause ice dams?
Ans: Clogged gutters can interfere with drainage and contribute to ice accumulation around the roof edge. However, ice dams are often associated with uneven roof temperatures and heat loss through the attic. Keeping gutters clear is useful, but insulation and ventilation should also be considered.
Q7. Do I need a professional roof inspection every autumn?
Ans: Not every roof requires the same inspection schedule. However, a professional assessment can be particularly useful if your roof is ageing, has experienced storm damage, has a history of leaks or has not been inspected recently. It is also sensible to arrange an inspection when you notice visible problems.
Get Your Denver Roof Ready Before Winter
Preparing your roof before winter can help you identify problems early and reduce the risk of avoidable damage during colder months.
From inspecting shingles and flashing to cleaning gutters, checking attic ventilation and addressing drainage issues, every part of your roofing system deserves attention.
The team at 303 Roofers helps homeowners across the Denver metro area understand their roofing needs and explore suitable inspection, maintenance and repair options.
Arrange a professional roof assessment before winter weather becomes more challenging. You can also follow 303 Roofers on Facebook for seasonal roofing tips, maintenance reminders and company updates.
A little preparation in autumn can make a meaningful difference to how well your roof handles the winter season.

Related Blog Articles